You can also find more possible Galaxy servers at the top of this tutorial in Available on these Galaxies
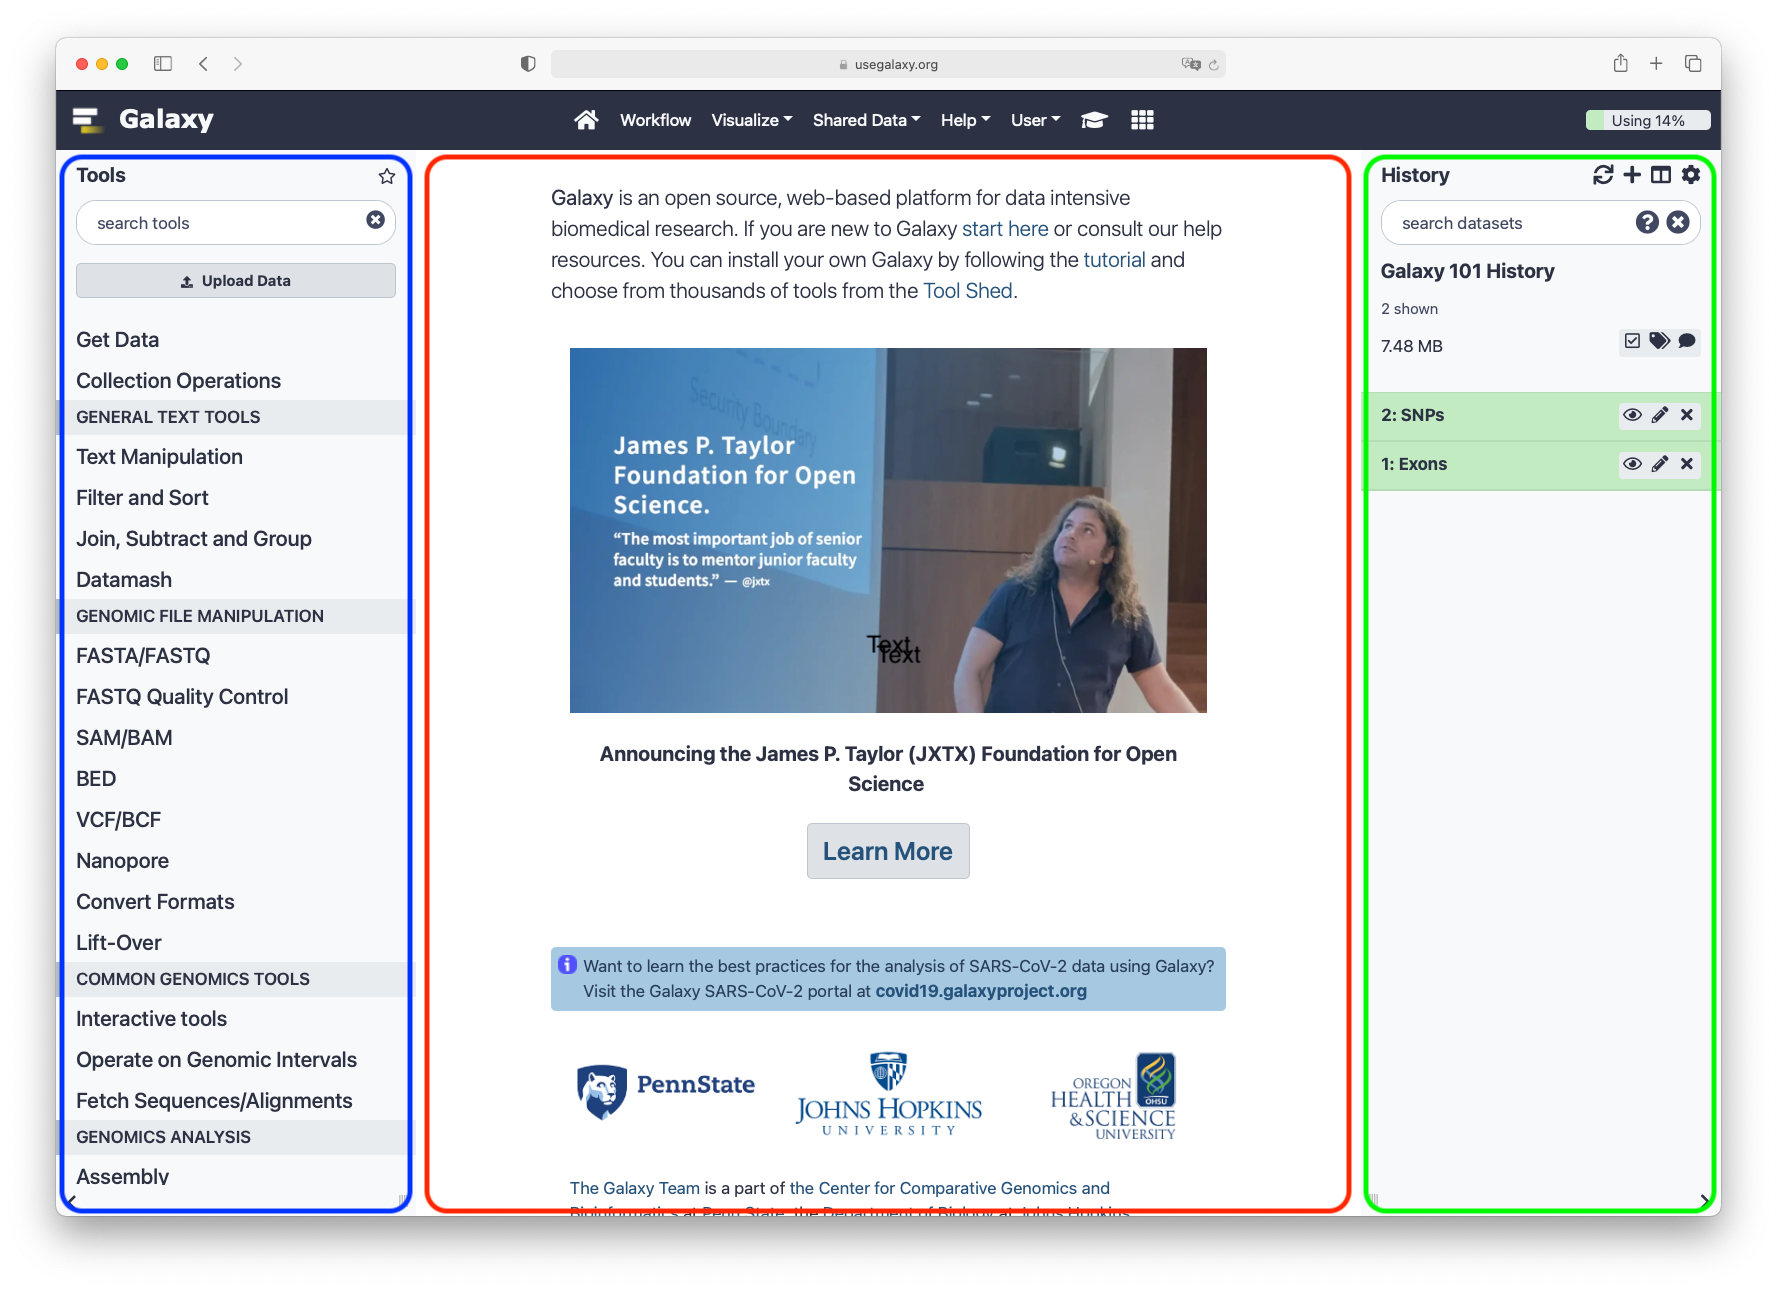
The Galaxy homepage is divided into three panels:
Tools on the left
Viewing panel in the middle
History of analysis and files on the right
The first time you use Galaxy, there will be no files in your history panel.
Key Galaxy actions
Name your current history
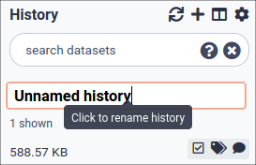
Your “History” is in the panel at the right.
Hands-on: Name history
Go to the History panel (on the right)
Click on the history name (which by default is “Unnamed history”)
Type in a new name, for example, “My Analysis”
Press Enter on your keyboard to save it
Comment: Renaming not an option?
If renaming does not work, it is possible you aren’t logged in, so try logging in to Galaxy first. Anonymous users are only permitted to have one history, and they cannot rename it.
Upload a file
Your “Tools” are in the panel at the left.
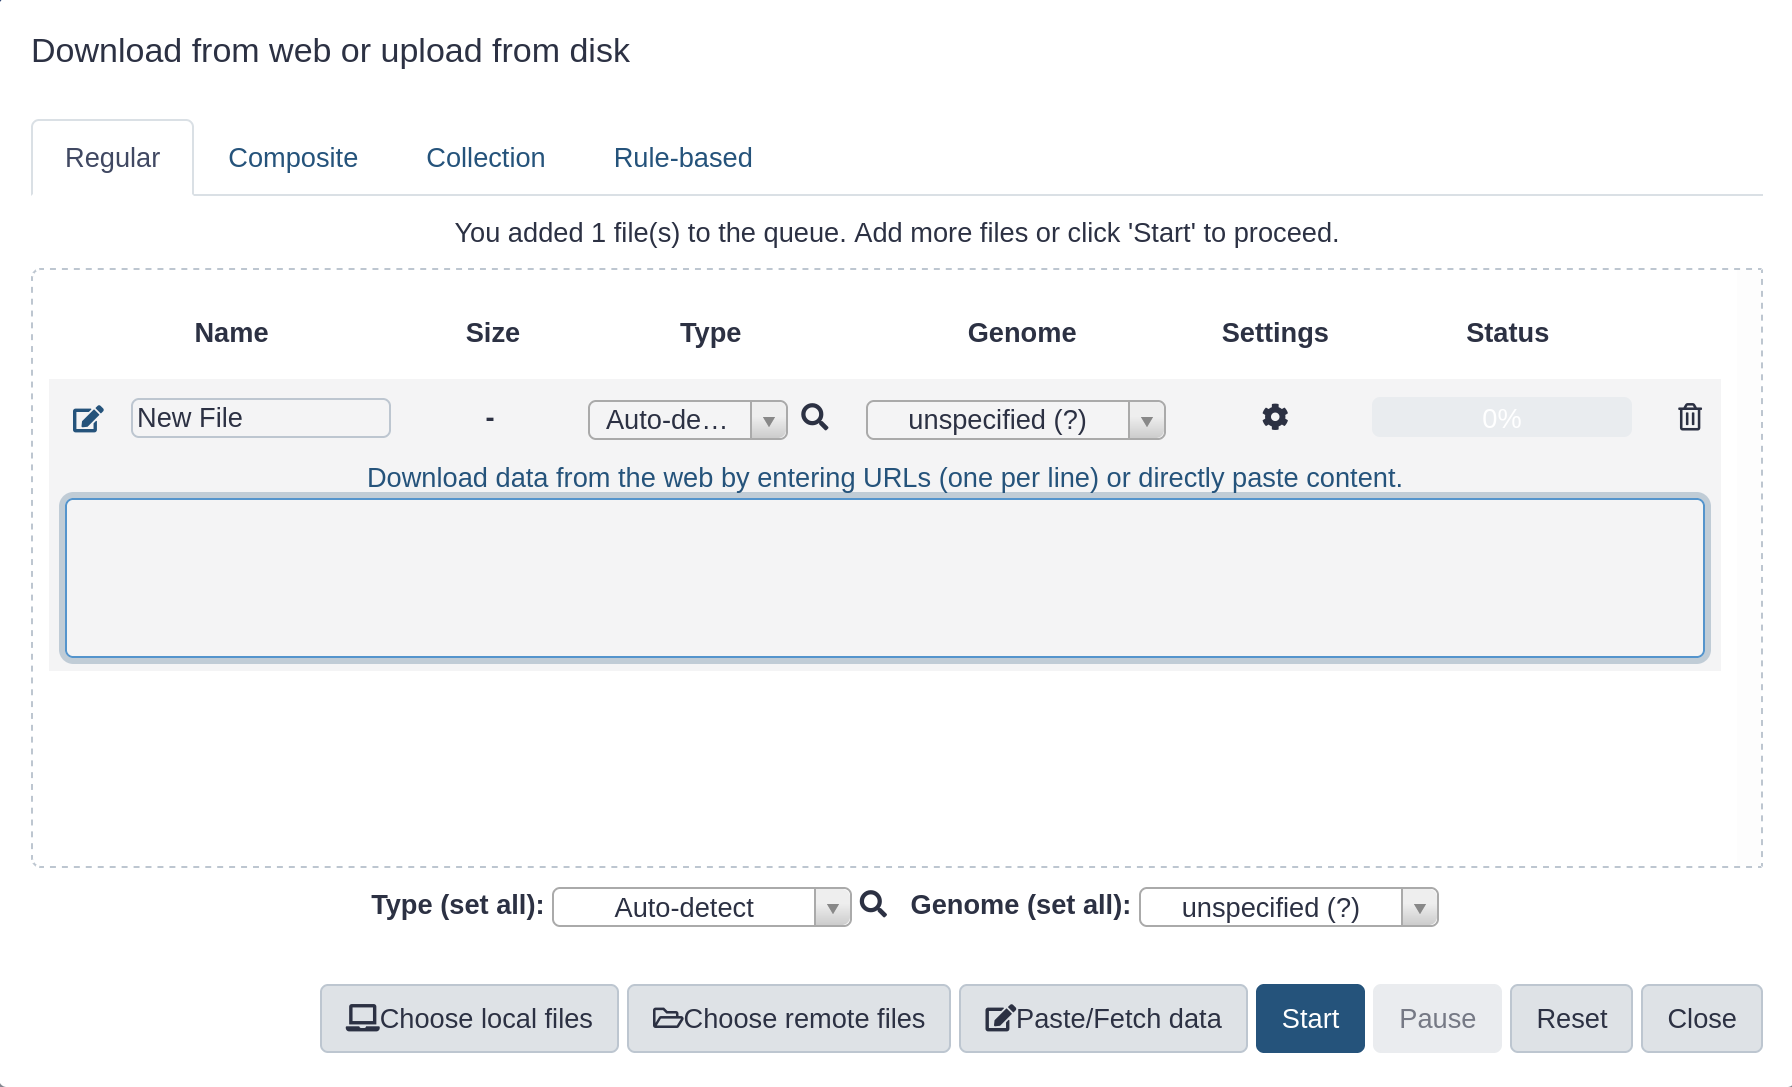
Hands-on: Upload a file from URL
At the top of the Tools panel (on the left), click galaxy-uploadUpload
Your uploaded file is now in your current history.
When the file has uploaded to Galaxy, it will turn green.
Comment
After this you will see your first history item (called a “dataset”) in Galaxy’s right panel. It will go through
the gray (preparing/queued) and yellow (running) states to become green (success).
What is this file?
Hands-on: View the dataset content
Click on the galaxy-eye (eye) icon next to the dataset name, to look at the file content
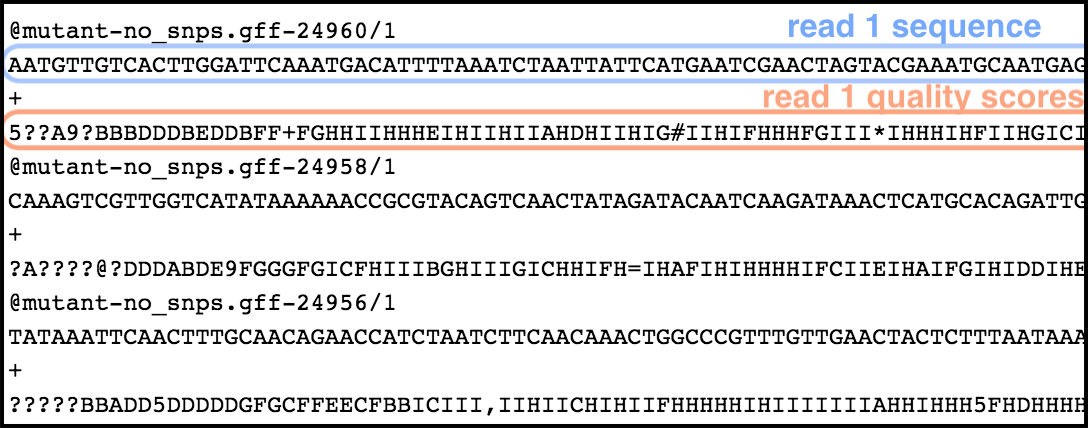
The contents of the file will be displayed in the central Galaxy panel.
This file contains DNA sequencing reads from a bacteria, in FASTQ format:
Use a tool
Let’s look at the quality of the reads in this file.
Hands-on: Use a tool
Type FastQC in the tools panel search box (top)
Click on the FastQCTool: toolshed.g2.bx.psu.edu/repos/devteam/fastqc/fastqc/0.73+galaxy0 tool
The tool will be displayed in the central Galaxy panel.
Select the following parameters:
param-file“Raw read data from your current history”: the FASTQ dataset that we uploaded
No change in the other parameters
Click Execute
This tool will run and two new output datasets will appear at the top of your history panel.
View results
We will now look at the output dataset called FastQC on data 1: Webpage.
Comment
Note that Galaxy has given this dataset a name according to both the tool name (“FastQC”) and the input (“data 1”) that it used.
The name “data 1” means the dataset number 1 in Galaxy’s current history (our FASTQ file).
Hands-on: View results
Once it’s green, click on the galaxy-eye (eye) icon next to the “Webpage” output dataset.
The information is displayed in the central panel
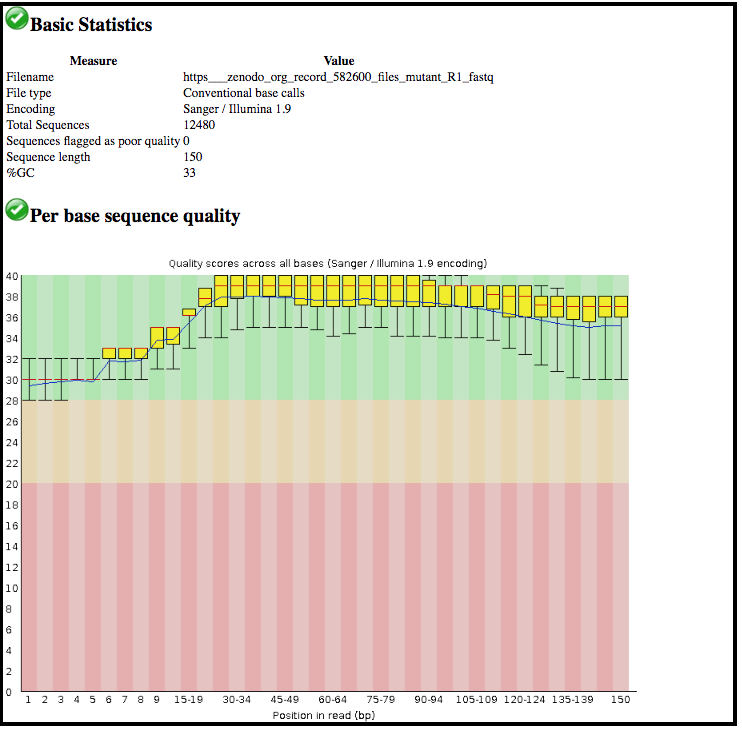
This tool has summarised information about all of the reads in our FASTQ file.
Question
What was the length of the reads in the input FASTQ file?
Do these reads have higher quality scores in the centre or at the ends?
150 bp
In the center
Run another tool
Let’s run a tool to filter out lower-quality reads from our FASTQ file.
Hands-on: Run another tool
Type Filter by quality in the tools panel search box (top)
Click on the tool Filter by qualityTool: toolshed.g2.bx.psu.edu/repos/devteam/fastq_quality_filter/cshl_fastq_quality_filter/1.0.2+galaxy0
“Percent of bases in sequence that must have quality equal to / higher than cut-off value”: 80
Click Execute
After the tool has run, its output dataset will appear at the top of your History panel.
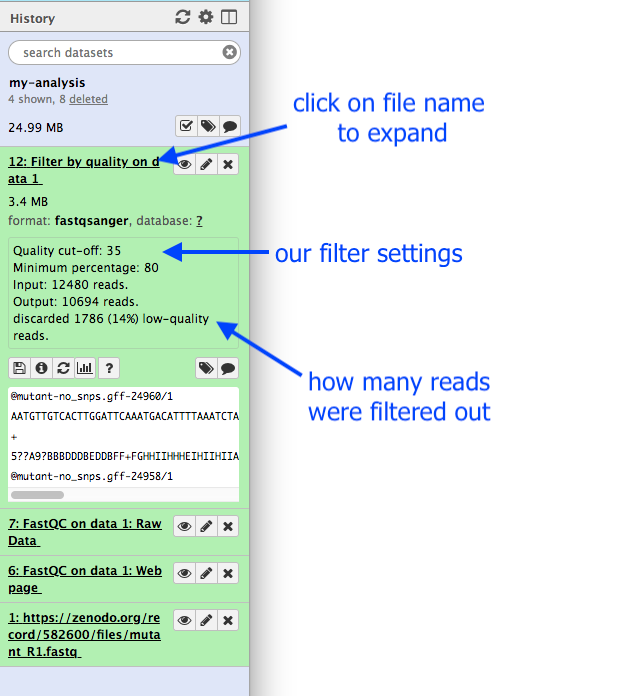
This dataset will be called “Filter by quality on data 1”.
Remember that Galaxy has named this file according to the tool it used (“Filter by quality”) and the input dataset (“data 1”).
The actual numbers in front of the datasets in the history are not important.
What are the results from this filtering tool?
We could click on the eye icon to view the contents of this output file, but it will not be very informative - we will just see a list of reads.
Hands-on: Get metadata about a file
Click on the output dataset name in the History panel.
This expands the information about the file.
Question
How many read has been discarded
1786 low-quality reads were discarded
Re-run that tool with changed settings
We can now try to filter our input reads to an even higher standard, and see how this changes the resulting output (an exploratory analysis). We will change the filter settings and re-run the tool.
Hands-on: Re-run the tool
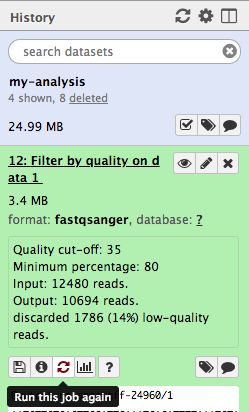
Click on the galaxy-refresh icon (Run this job again) for the output dataset of Filter by qualitytool
This brings up the tool interface in the central panel with the parameters set to the values used previously to generate this dataset.
Change the settings to something even stricter
For example, you might decide you want 80 percent of bases to have a quality of 36 or higher, instead of 35.
Click Execute
View the results: Click on the output dataset name to expand the information. (Note: not the galaxy-eye (eye) icon.)
Question
How many reads were discarded under these new filtering conditions?
You can re-run a tool many times with different settings. Each time you re-run the tool, its new output datasets will appear at the top of your current history.
Convert your analysis history into a workflow
When you look carefully at your history, you can see that it contains all the steps of our analysis, from the beginning (at the bottom) to the end (on top). The history in Galaxy records details of every tool you run and preserves all parameter settings applied at each step. But when you need to analyze new data, it would be tedious to do each step one-by-one again. Wouldn’t it be nice to just convert this history into a workflow that we will be able to execute again and again?
Galaxy makes this very easy with the Extract workflow option. This means any time you want to build a workflow, you can just perform the steps once manually, and then convert it to a workflow, so that next time it will be a lot less work to do the same analysis.
Hands-on: Extract workflow
Clean up your history: remove any failed (red) jobs from your history by clicking on the galaxy-cross button.
This will make the creation of the workflow easier.
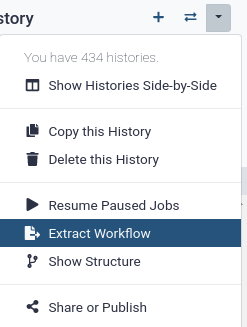
Click on galaxy-gear (History options) at the top of your history panel and select Extract workflow.
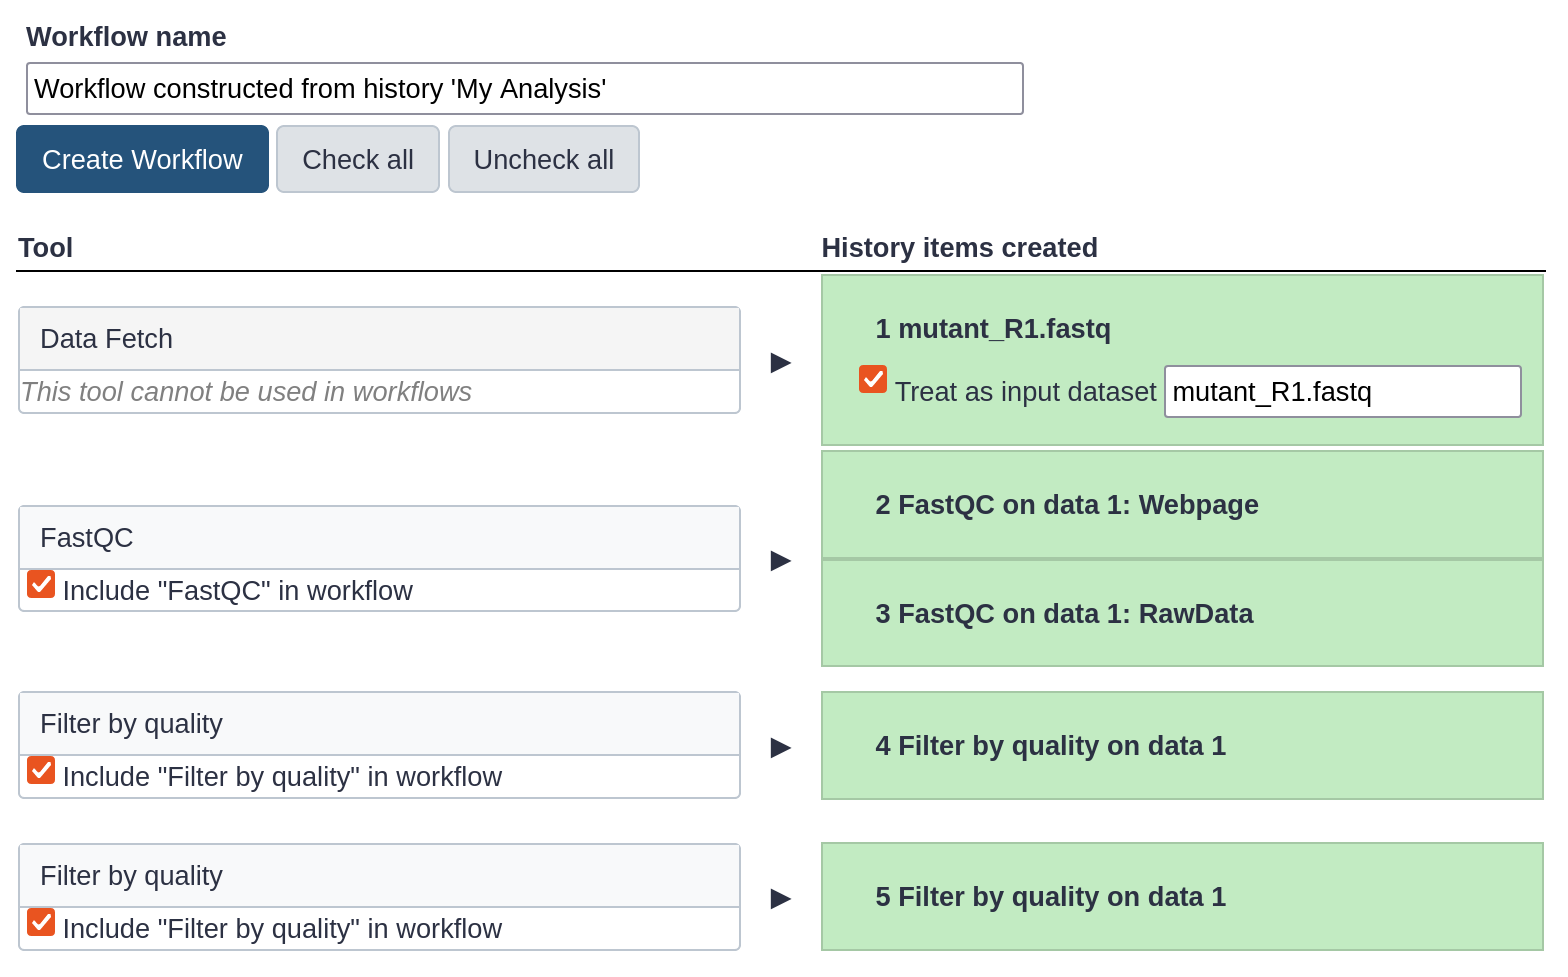
The central panel will show the content of the history in reverse order (oldest on top), and you will be able to choose which steps to include in the workflow.
Replace the Workflow name to something more descriptive, for example: QC and filtering.
Rename the workflow input in the box at the top of second column to: FASTQ reads
If there are any steps that shouldn’t be included in the workflow, you can uncheck them in the first column of boxes. In this case, uncheck the second Filter by quality tool at the bottom, where we used a too high quality cut-off.
Click on the Create Workflow button near the top.
You will get a message that the workflow was created.
In a minute we will see how to find the extracted workflow and how to use it.
Create a new history
Let’s create a new history.
Hands-on: New history
Create a new history
Click the new-history icon at the top of the history panel.
If the new-history is missing:
Click on the galaxy-gear icon (History options) on the top of the history panel
Select the option Create New from the menu
Rename your history, e.g. “Next Analysis”
Click on Unnamed history (or the current name of the history) (Click to rename history) at the top of your history panel
Type the new name
Press Enter
This new history does not have any datasets in it yet.
Look at all your histories
Where is your first history, called “My Analysis”?
Hands-on: View histories
Click on the View all histories (galaxy-columns icon) at the top right of your history
A new page will appear with all your histories displayed here.
Copy a dataset into your new history
Click on the FASTQ dataset in “My Analysis” history
Drag it into the “Next Analysis” history
This makes a copy of the dataset in the new history (without actually using additional disk space).
Click on the Home icon galaxy-home (or Analyze Data on older versions of Galaxy) in the top panel to go back to your analysis window
Figure 1: Copy a dataset between histories by dragging it
Your main Galaxy window will now show “Next Analysis” as the current history, and it will have one dataset in it.
At any time, you can go back into the “View all histories” page and “Switch to” a different history.
Run workflow in the new history
Now that we have built our workflow, let’s use it to re-create our small analysis in a single step. The same workflow could also be used on some new FASTQ data to quickly repeat the same analysis on different inputs.
Hands-on: Run workflow
Click on Workflow in the top menu bar of Galaxy.
Here you have a list of all your workflows.
Your newly created workflow should be listed at the top:
If you click on a workflow name, you can see all available actions for the workflow, e.g. edit, copy, rename, delete.
Click on the workflow-run (Run workflow) button next to your workflow.
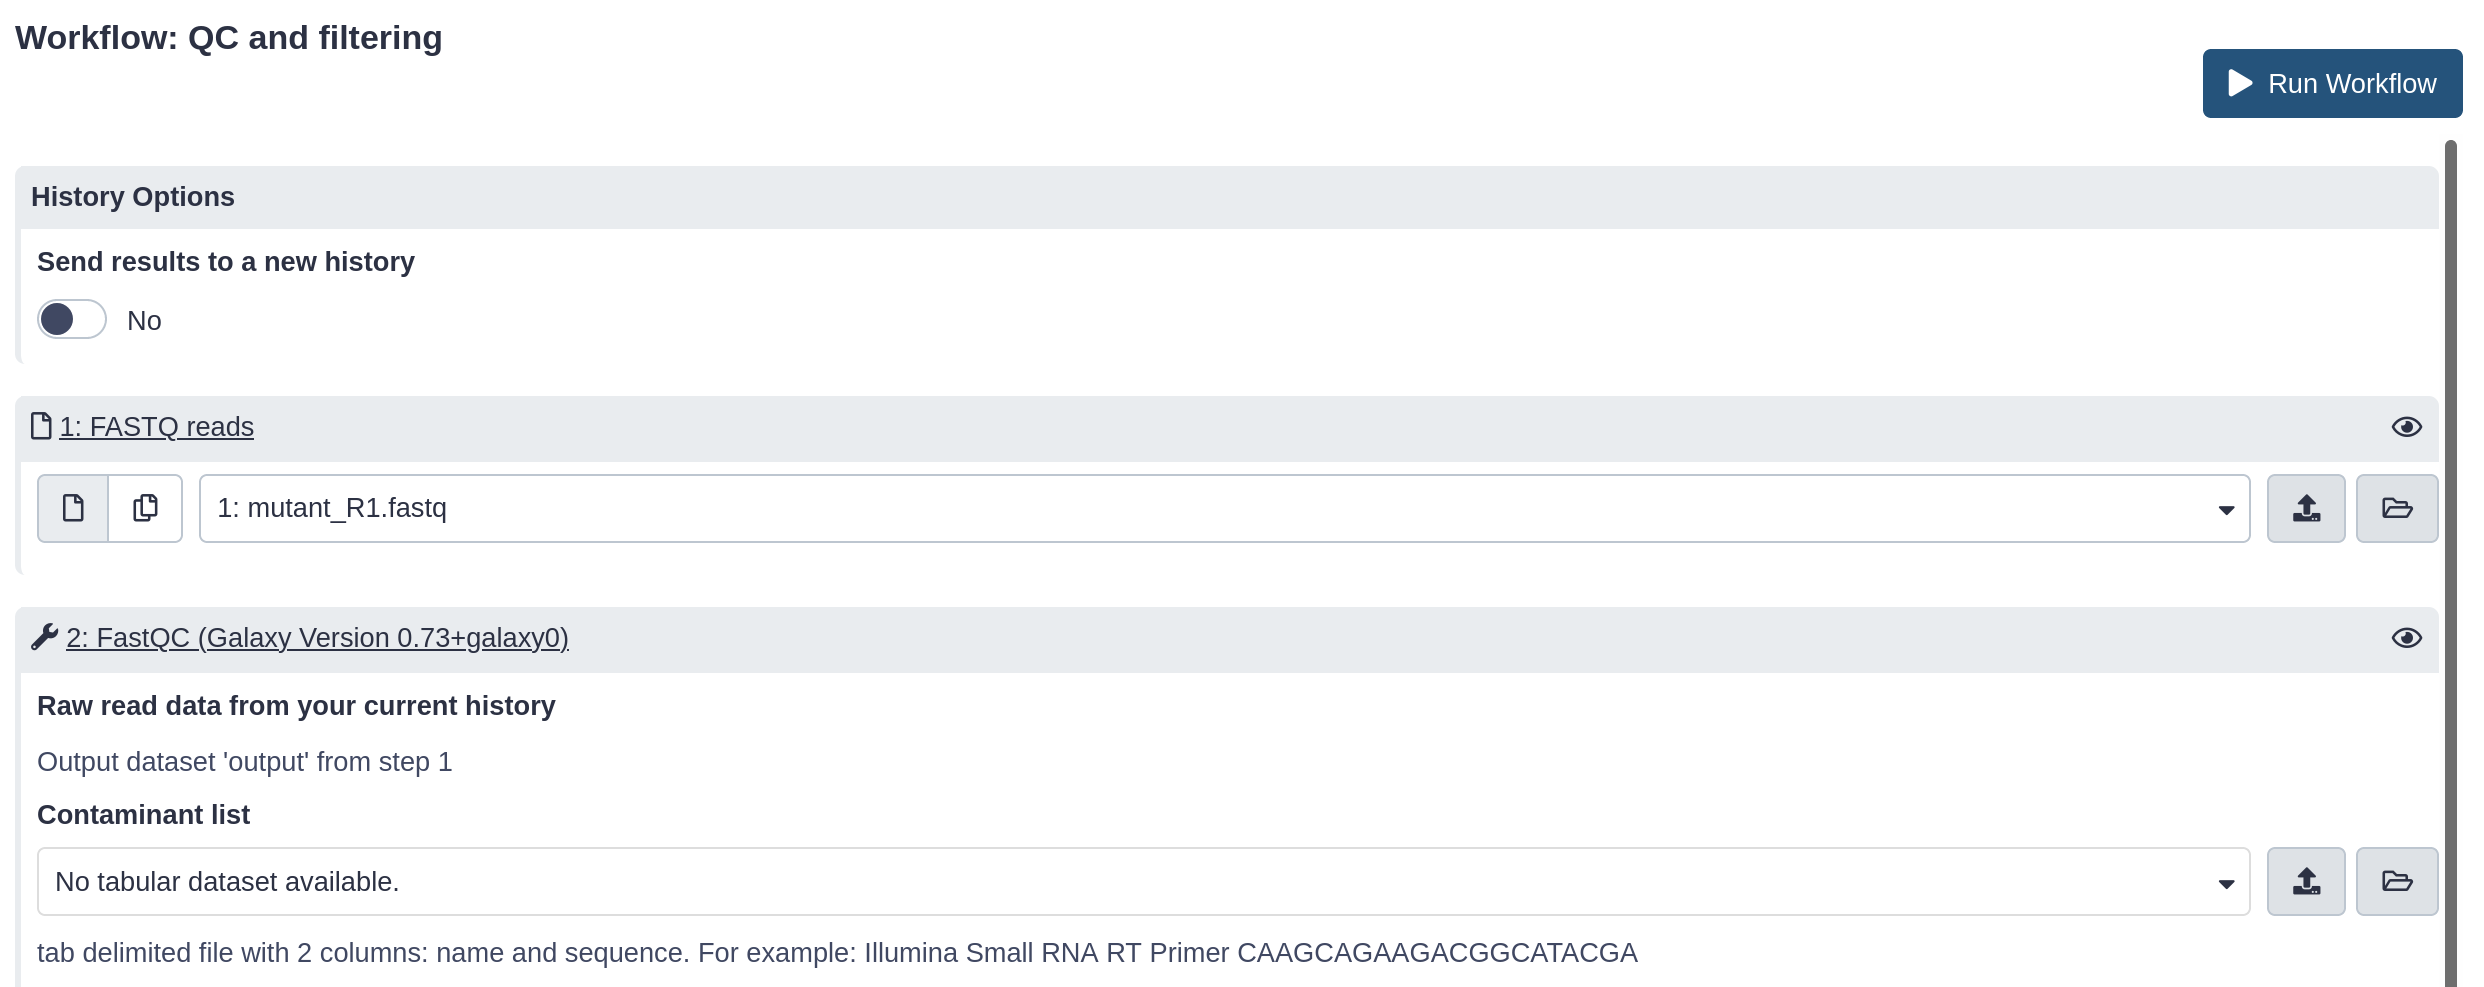
The central panel will change to allow you to configure and launch the workflow.
Check that the “FASTQ reads” input is set to the FASTQ dataset we have copied to the new history.
In this page we could change any parameter for the tools composing the workflow as we would do when running them one by one.
Click the Run Workflow button at the top-right of the screen.
You should see a message that the workflow was successfully invoked. Then jobs will start to run and datasets appear in your “Next Analysis” history, replicating the steps of your previous history.
Conclusion
trophy Well done! You have completed the short introduction to Galaxy, where you named the history, uploaded a file, used a tool, viewed results and run a workflow. Additional tutorials are available for a more in-depth introduction to Galaxy’s features.
Key points
The Galaxy interface has tools on the left, viewing pane in the middle, and a history of your data analysis on the right.
You can create a new history for each analysis. All your histories are saved.
To get data into Galaxy, you can upload a file by pasting in a web address. There are other ways to get data into Galaxy (not covered in this tutorial): you can upload a file from your computer, and you can import an entire history.
Choose a tool and change any settings for your analysis.
Run the tool. The output files will be saved at the top of your history.
View the output files by clicking on the eye icon.
View all your histories and move files between them. Switch to a different history.
Log out of your Galaxy server. When you log back in (to the same server), your histories will all be there.
Did you use this material as an instructor? Feel free to give us feedback on how it went.
Did you use this material as a learner or student? Click the form below to leave feedback.
Batut et al., 2018 Community-Driven Data Analysis Training for Biology Cell Systems 10.1016/j.cels.2018.05.012
@misc{introduction-galaxy-intro-short,
author = "Anna Syme and Nicola Soranzo",
title = "A short introduction to Galaxy (Galaxy Training Materials)",
year = "",
month = "",
day = ""
url = "\url{https://training.galaxyproject.org/training-material/topics/introduction/tutorials/galaxy-intro-short/tutorial.html}",
note = "[Online; accessed TODAY]"
}
@article{Batut_2018,
    doi = {10.1016/j.cels.2018.05.012},
    url = {https://doi.org/10.1016%2Fj.cels.2018.05.012},
    year = 2018,
    month = {jun},
    publisher = {Elsevier {BV}},
    volume = {6},
    number = {6},
    pages = {752--758.e1},
    author = {B{\'{e}}r{\'{e}}nice Batut and Saskia Hiltemann and Andrea Bagnacani and Dannon Baker and Vivek Bhardwaj and Clemens Blank and Anthony Bretaudeau and Loraine Brillet-Gu{\'{e}}guen and Martin {\v{C}}ech and John Chilton and Dave Clements and Olivia Doppelt-Azeroual and Anika Erxleben and Mallory Ann Freeberg and Simon Gladman and Youri Hoogstrate and Hans-Rudolf Hotz and Torsten Houwaart and Pratik Jagtap and Delphine Larivi{\`{e}}re and Gildas Le Corguill{\'{e}} and Thomas Manke and Fabien Mareuil and Fidel Ram{\'{\i}}rez and Devon Ryan and Florian Christoph Sigloch and Nicola Soranzo and Joachim Wolff and Pavankumar Videm and Markus Wolfien and Aisanjiang Wubuli and Dilmurat Yusuf and James Taylor and Rolf Backofen and Anton Nekrutenko and Björn Grüning},
    title = {Community-Driven Data Analysis Training for Biology},
    journal = {Cell Systems}
}
Congratulations on successfully completing this tutorial!
 Anna Syme

 Nicola Soranzo
 Questions: