Galaxy Webhooks
 Clemens Blank
 Martin Čech
 Björn Grüning
OverviewQuestions:Objectives:
What are Galaxy Webhooks?
How to create them?
Discover what Galaxy Webhooks are
Be able to create Webhooks
Be able to add a Galaxy Webhook in a Galaxy instance
Time estimation: 1 hourSupporting Materials:Last modification: Sep 28, 2022
 Questions:
Introduction
In this tutorial we are going to demonstrate how to add a webhook to the tool-execution endpoint. This is the web-page that appears after you have executed a tool. As a more useful example we are going to ask phdcomics for a random comic that we can display to entertain our users.
At first let’s create a config file that defines the name and the type of your webhook. The name is phdcomics and with the type we define the entry-points
at which we modify the Galaxy user-interface. In our case we want to display an image at the tool and workflow entry-point.
The key activate gives you control per-webhook to activate or deactivate it.
Hands-on: Hands-on
Create a file named
config/phdcomics.yamlwith the following content:name: phdcomics type: - tool - workflow activate: true
The next step is to define HTML/JS part which will control the part of the Galaxy UI. We create a new PHDComicsAppView view extended from Backbone.
Inside this view we define a simple div-container with a button and a placeholder for our image called phdcomics-img. You can add additional
functionality to your view, for example getting a new image on button click. The essential functionality however is stored getRandomComic.
The big problem with phdcomics is that there is no nice API to retrive the comics, so we need to fallback to parse the HTML pages. We decided to do this
in Python to demonstrate webhooks abilitity to call self-defined python functions. Please note the url = galaxyRoot + 'api/webhooks/phdcomics/get_data';, which
calls an REST endpoint defined by use in the next step. The return value of this endpoint is retrived in JS and can be displayed or modified.
Hands-on: Hands-on
Create a file named
static/script.jswith the following content:$(document).ready(function() { var galaxyRoot = typeof Galaxy != 'undefined' ? Galaxy.root : '/'; var PHDComicsAppView = Backbone.View.extend({ el: '#phdcomics', appTemplate: _.template( '<div id="phdcomics-header">' + '<div id="phdcomics-name">PHD Comics</div>' + '<button id="phdcomics-random">Random</button>' + '</div>' + '<div id="phdcomics-img"></div>' ), imgTemplate: _.template('<img src="<%= src %>"">'), events: { 'click #phdcomics-random': 'getRandomComic' }, initialize: function() { this.render(); }, render: function() { this.$el.html(this.appTemplate()); this.$comicImg = this.$('#phdcomics-img'); this.getRandomComic(); return this; }, getRandomComic: function() { var me = this, url = galaxyRoot + 'api/webhooks/phdcomics/get_data'; this.$comicImg.html($('<div/>', { id: 'phdcomics-loader' })); $.getJSON(url, function(data) { if (data.success) { me.renderImg(data.src); } else { console.error('[ERROR] "' + url + '":\n' + data.error); } }); }, renderImg: function(src) { this.$comicImg.html(this.imgTemplate({src: src})); } }); new PHDComicsAppView(); });
The following hands-on will define an API endpoint that is called from the JS code of your webhook.
Make sure you name the python function main and that all third-party requirements are installed in your Galaxy virtual environment.
Please note that the main() can consume params from your client but also the Galaxy trans object, which will give you access to the
entire user-object, including histories and datasets.
Hands-on: Hands-on
Create a file named
helper/__init__.pywith the following content:import urllib import re import random import logging log = logging.getLogger(__name__) def main(trans, webhook, params): error = '' comic_src = '' try: # Third-party dependencies try: from bs4 import BeautifulSoup except ImportError as e: log.exception(e) return {'success': False, 'error': str(e)} # Get latest id if 'latest_id' not in webhook.config.keys(): url = 'https://phdcomics.com/gradfeed.php' content = urllib.urlopen(url).read() soap = BeautifulSoup(content, 'html.parser') pattern = '(?:https://www\.phdcomics\.com/comics\.php\?f=)(\d+)' webhook.config['latest_id'] = max([ int(re.search(pattern, link.text).group(1)) for link in soap.find_all('link', text=re.compile(pattern)) ]) random_id = random.randint(1, webhook.config['latest_id']) url = 'https://www.phdcomics.com/comics/archive.php?comicid=%d' % \ random_id content = urllib.urlopen(url).read() soup = BeautifulSoup(content, 'html.parser') comic_img = soup.find_all('img', id='comic2') try: comic_src = comic_img[0].attrs.get('src') except IndexError: pattern = '<img id=comic2 name=comic2 src=([\w:\/\.]+)' comic_src = re.search(pattern, content).group(1) except Exception as e: error = str(e) return {'success': not error, 'error': error, 'src': comic_src}
To make your webhook appealing you can also add custom CSS which you can use in your HTML/JS code.
Hands-on: Hands-on
Create a file named
static/styles.csswith the following content:#phdcomics { border: 1px solid #52697d; text-align: center; border-radius: 3px; overflow: hidden; } #phdcomics-header { background: #52697d; border-bottom: 1px solid #52697d; padding: 15px 0; } #phdcomics-name { color: #fff; padding-bottom: 10px; } #phdcomics-header button { color: #fff; font-size: 14px; background-color: #768fa5; border: none; border-radius: 7px; box-shadow: 0 5px #5c768c; padding: 5px 10px; } #phdcomics-header button:focus { outline: 0; } #phdcomics-header button:hover { background-color: #67839b; } #phdcomics-header button:active { background-color: #67839b; box-shadow: 0 0 #5c768c; transform: translateY(5px); } #phdcomics-img { background: #fff; } #phdcomics-img img { padding: 10px; max-width: 100%; margin-bottom: -4px; } #phdcomics-loader { border: 5px solid #f3f3f3; border-top: 5px solid #52697d; border-radius: 50%; width: 25px; height: 25px; animation: spin 1.5s linear infinite; margin: 15px auto; } @keyframes spin { 0% { transform: rotate(0deg); } 100% { transform: rotate(360deg); } }
Please make sure you have activated webhooks in your config/galaxy.yml file by setting the webhooks_dir to the path in which your phdcomics folder is located.
Hands-on: Hands-on
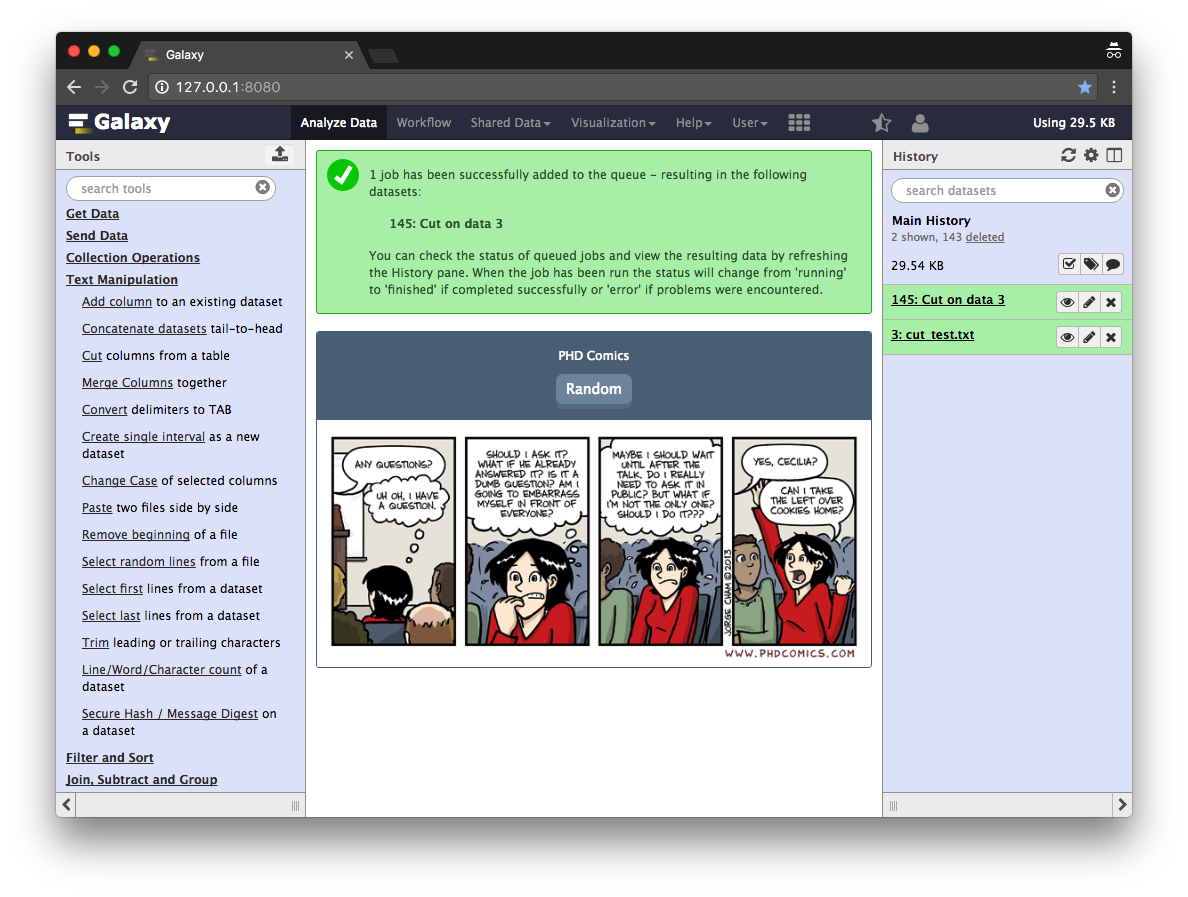
- Submit one tool and see if your webhook is working on the tool-submit page.
If successful it should look like this:
Conclusion
First of all, thank you for completing this tutorial. We have learned how to add webhooks to your Galaxy.
Key points
A Galaxy Webhook provides an easy way to customize the Galaxy UI with plugins
Right now there are 4 entry points: tool, workflow, masthead, history-menu
With a minimal amount of code you can extend Galaxy’s user-interace.
Frequently Asked Questions
Have questions about this tutorial? Check out the tutorial FAQ page or the FAQ page for the Development in Galaxy topic to see if your question is listed there. If not, please ask your question on the GTN Gitter Channel or the Galaxy Help ForumFeedback
Did you use this material as an instructor? Feel free to give us feedback on how it went.
Did you use this material as a learner or student? Click the form below to leave feedback.

Citing this Tutorial
- Clemens Blank, Martin Čech, Björn Grüning, Galaxy Webhooks (Galaxy Training Materials). https://training.galaxyproject.org/training-material/topics/dev/tutorials/webhooks/tutorial.html Online; accessed TODAY
- Batut et al., 2018 Community-Driven Data Analysis Training for Biology Cell Systems 10.1016/j.cels.2018.05.012
Congratulations on successfully completing this tutorial!@misc{dev-webhooks, author = "Clemens Blank and Martin Čech and Björn Grüning", title = "Galaxy Webhooks (Galaxy Training Materials)", year = "", month = "", day = "" url = "\url{https://training.galaxyproject.org/training-material/topics/dev/tutorials/webhooks/tutorial.html}", note = "[Online; accessed TODAY]" } @article{Batut_2018, doi = {10.1016/j.cels.2018.05.012}, url = {https://doi.org/10.1016%2Fj.cels.2018.05.012}, year = 2018, month = {jun}, publisher = {Elsevier {BV}}, volume = {6}, number = {6}, pages = {752--758.e1}, author = {B{\'{e}}r{\'{e}}nice Batut and Saskia Hiltemann and Andrea Bagnacani and Dannon Baker and Vivek Bhardwaj and Clemens Blank and Anthony Bretaudeau and Loraine Brillet-Gu{\'{e}}guen and Martin {\v{C}}ech and John Chilton and Dave Clements and Olivia Doppelt-Azeroual and Anika Erxleben and Mallory Ann Freeberg and Simon Gladman and Youri Hoogstrate and Hans-Rudolf Hotz and Torsten Houwaart and Pratik Jagtap and Delphine Larivi{\`{e}}re and Gildas Le Corguill{\'{e}} and Thomas Manke and Fabien Mareuil and Fidel Ram{\'{\i}}rez and Devon Ryan and Florian Christoph Sigloch and Nicola Soranzo and Joachim Wolff and Pavankumar Videm and Markus Wolfien and Aisanjiang Wubuli and Dilmurat Yusuf and James Taylor and Rolf Backofen and Anton Nekrutenko and Björn Grüning}, title = {Community-Driven Data Analysis Training for Biology}, journal = {Cell Systems} }