Use Singularity containers for running Galaxy jobs

 Torfinn Nome
 Marius van den Beek
 Matthias Bernt
 Helena Rasche
OverviewQuestions:Objectives:
Requirements:
Configure your Galaxy to use Singularity and BioContainers for running jobs
- Galaxy Server administration
- Ansible: slides slides - tutorial hands-on
- Galaxy Installation with Ansible: slides slides - tutorial hands-on
Time estimation: 1 hourSupporting Materials:Last modification: Oct 18, 2022
 Questions:
In this tutorial you will learn how to configure Galaxy to run jobs using Singularity containers provided by the BioContainers community.
Background
BioContainers is a community-driven project that provides the infrastructure and basic guidelines to create, manage and distribute bioinformatics packages (e.g conda) and containers (e.g docker, singularity). BioContainers is based on the popular frameworks Conda, Docker and Singularity.
– https://biocontainers-edu.readthedocs.io/en/latest/what_is_biocontainers.html
Singularity is an alternative to Docker that is much friendlier for HPCs
Singularity is a container platform. It allows you to create and run containers that package up pieces of software in a way that is portable and reproducible.
Agenda
Comment: Galaxy Admin Training PathThe yearly Galaxy Admin Training follows a specific ordering of tutorials. Use this timeline to help keep track of where you are in Galaxy Admin Training.
Installing Singularity
First, we will install Singularity using Ansible. On most operating systems there is no package for singularity yet, so we must use a role which will compile it from source. If you’re on CentOS7/8, it is available through the EPEL repository.
If you are using CentOS7, you can skip this hands-on section and instead install the
epel-releaseandsingularitysystem packages in yourpre_tasks.
Hands-on: Installing Singularity with Ansible
In your working directory, add the Singularity role to your
requirements.ymlfile:--- a/requirements.yml +++ b/requirements.yml @@ -16,3 +16,7 @@ version: 0.0.1 - src: galaxyproject.cvmfs version: 0.2.13 +- src: cyverse-ansible.singularity + version: 048c4f178077d05c1e67ae8d9893809aac9ab3b7 +- src: gantsign.golang + version: 2.6.3If you haven’t worked with diffs before, this can be something quite new or different.
If we have two files, let’s say a grocery list, in two files. We’ll call them ‘a’ and ‘b’.
Old $ cat old
🍎
🍐
🍊
🍋
🍒
🥑New $ cat new
🍎
🍐
🍊
🍋
🍍
🥑We can see that they have some different entries. We’ve removed 🍒 because they’re awful, and replaced them with an 🍍
Diff lets us compare these files
$ diff old new
5c5
< 🍒
---
> 🍍
Here we see that 🍒 is only in a, and 🍍 is only in b. But otherwise the files are identical.
There are a couple different formats to diffs, one is the ‘unified diff’
$ diff -U2 old new
--- old	2022-02-16 14:06:19.697132568 +0100
+++ new	2022-02-16 14:06:36.340962616 +0100
@@ -3,4 +3,4 @@
 🍊
 🍋
-🍒
+🍍
 🥑
This is basically what you see in the training materials which gives you a lot of context about the changes:
--- oldis the ‘old’ file in our view+++ newis the ‘new’ file- @@ these lines tell us where the change occurs and how many lines are added or removed.
- Lines starting with a - are removed from our ‘new’ file
- Lines with a + have been added.
So when you go to apply these diffs to your files in the training:
- Ignore the header
- Remove lines starting with - from your file
- Add lines starting with + to your file
The other lines (🍊/🍋 and 🥑) above just provide “context”, they help you know where a change belongs in a file, but should not be edited when you’re making the above change. Given the above diff, you would find a line with a 🍒, and replace it with a 🍍
Added & Removed Lines
Removals are very easy to spot, we just have removed lines
--- old	2022-02-16 14:06:19.697132568 +0100
+++ new	2022-02-16 14:10:14.370722802 +0100
@@ -4,3 +4,2 @@
 🍋
 🍒
-🥑
And additions likewise are very easy, just add a new line, between the other lines in your file.
--- old	2022-02-16 14:06:19.697132568 +0100
+++ new	2022-02-16 14:11:11.422135393 +0100
@@ -1,3 +1,4 @@
 🍎
+🍍
 🍐
 🍊
Completely new files
Completely new files look a bit different, there the “old” file is
/dev/null, the empty file in a Linux machine.$ diff -U2 /dev/null old
--- /dev/null 2022-02-15 11:47:16.100000270 +0100
+++ old 2022-02-16 14:06:19.697132568 +0100
@@ -0,0 +1,6 @@
+🍎
+🍐
+🍊
+🍋
+🍒
+🥑And removed files are similar, except with the new file being /dev/null
--- old	2022-02-16 14:06:19.697132568 +0100
+++ /dev/null	2022-02-15 11:47:16.100000270 +0100
@@ -1,6 +0,0 @@
-🍎
-🍐
-🍊
-🍋
-🍒
-🥑
Install the requirements with
ansible-galaxy:Input: Bashansible-galaxy install -p roles -r requirements.ymlSpecify which version of Singularity you want to install, in
group_vars/galaxyservers.yml:--- a/group_vars/galaxyservers.yml +++ b/group_vars/galaxyservers.yml @@ -143,6 +143,12 @@ nginx_ssl_role: usegalaxy_eu.certbot nginx_conf_ssl_certificate: /etc/ssl/certs/fullchain.pem nginx_conf_ssl_certificate_key: /etc/ssl/user/privkey-nginx.pem +# Golang +golang_gopath: '/opt/workspace-go' +# Singularity target version +singularity_version: "3.7.4" +singularity_go_path: "{{ golang_install_dir }}" + # TUS galaxy_tusd_port: 1080 tusd_instances:Add the new roles to your
galaxy.ymlplaybook, before the Galaxy server itself. We’ll do this bceause it’s a dependency of Galaxy to run, so it needs to be there before Galaxy starts.--- a/galaxy.yml +++ b/galaxy.yml @@ -14,6 +14,8 @@ become: true become_user: postgres - geerlingguy.pip + - gantsign.golang + - cyverse-ansible.singularity - galaxyproject.galaxy - role: uchida.miniconda become: trueRun the playbook
Input: Bashansible-playbook galaxy.ymlSingularity should now be installed on your Galaxy server. You can test this by connecting to your server and run the following command:
Input: Bashsingularity run docker://hello-worldOutput: BashINFO: Converting OCI blobs to SIF format INFO: Starting build... Getting image source signatures Copying blob 0e03bdcc26d7 done Copying config b23a8f6569 done Writing manifest to image destination Storing signatures 2021/01/08 11:25:12 info unpack layer: sha256:0e03bdcc26d7a9a57ef3b6f1bf1a210cff6239bff7c8cac72435984032851689 INFO: Creating SIF file... WARNING: passwd file doesn't exist in container, not updating WARNING: group file doesn't exist in container, not updating Hello from Docker! This message shows that your installation appears to be working correctly. ...
Configure Galaxy to use Singularity
Now, we will configure Galaxy to run tools using Singularity containers, which will be automatically fetched from the BioContainers repository.
Hands-on: Configure Galaxy to use Singularity
Edit the
group_vars/galaxyservers.ymlfile and add adependency_resolvers_config_fileentry and a correspondinggalaxy_config_templatetsentry:--- a/group_vars/galaxyservers.yml +++ b/group_vars/galaxyservers.yml @@ -29,6 +29,8 @@ miniconda_manage_dependencies: false galaxy_config: galaxy: + dependency_resolvers_config_file: "{{ galaxy_config_dir }}/dependency_resolvers_conf.xml" + containers_resolvers_config_file: "{{ galaxy_config_dir }}/container_resolvers_conf.xml" tool_data_table_config_path: /cvmfs/data.galaxyproject.org/byhand/location/tool_data_table_conf.xml,/cvmfs/data.galaxyproject.org/managed/location/tool_data_table_conf.xml brand: "🧬🔬🚀" admin_users: admin@example.org @@ -87,6 +89,10 @@ galaxy_config: galaxy_config_templates: - src: templates/galaxy/config/job_conf.yml.j2 dest: "{{ galaxy_config.galaxy.job_config_file }}" + - src: templates/galaxy/config/container_resolvers_conf.xml.j2 + dest: "{{ galaxy_config.galaxy.containers_resolvers_config_file }}" + - src: templates/galaxy/config/dependency_resolvers_conf.xml + dest: "{{ galaxy_config.galaxy.dependency_resolvers_config_file }}" # systemd galaxy_manage_systemd: trueCreate the
templates/galaxy/configdirectory if it doesn’t exist:Input: Bashmkdir -p templates/galaxy/configCreate the new file
templates/galaxy/config/dependency_resolvers_conf.xml. This will not enable any dependency resolvers like the legacy toolshed packages or Galaxy packages, and instead everything will be resolved through Singularity.--- /dev/null +++ b/templates/galaxy/config/dependency_resolvers_conf.xml @@ -0,0 +1,2 @@ +<dependency_resolvers> +</dependency_resolvers>Create the new file
templates/galaxy/config/container_resolvers_conf.xml.j2, this specifies the order in which to attempt container resolution.--- /dev/null +++ b/templates/galaxy/config/container_resolvers_conf.xml.j2 @@ -0,0 +1,6 @@ +<containers_resolvers> + <explicit_singularity /> + <cached_mulled_singularity cache_directory="{{ galaxy_mutable_data_dir }}/cache/singularity" /> + <mulled_singularity auto_install="False" cache_directory="{{ galaxy_mutable_data_dir }}/cache/singularity" /> + <build_mulled_singularity auto_install="False" cache_directory="{{ galaxy_mutable_data_dir }}/cache/singularity" /> +</containers_resolvers>Now, we want to make Galaxy run jobs using Singularity. Modify the file
templates/galaxy/config/job_conf.yml.j2, by adding thesingularity_enabledparameter:--- a/templates/galaxy/config/job_conf.yml.j2 +++ b/templates/galaxy/config/job_conf.yml.j2 @@ -4,10 +4,23 @@ runners: workers: 4 execution: - default: local_dest + default: singularity environments: local_dest: runner: local_runner + singularity: + runner: local_runner + singularity_enabled: true + env: + # Ensuring a consistent collation environment is good for reproducibility. + - name: LC_ALL + value: C + # The cache directory holds the docker containers that get converted + - name: SINGULARITY_CACHEDIR + value: /tmp/singularity + # Singularity uses a temporary directory to build the squashfs filesystem + - name: SINGULARITY_TMPDIR + value: /tmp tools: - class: local # these special tools that aren't parameterized for remote execution - expression tools, upload, etcRe-run the playbook
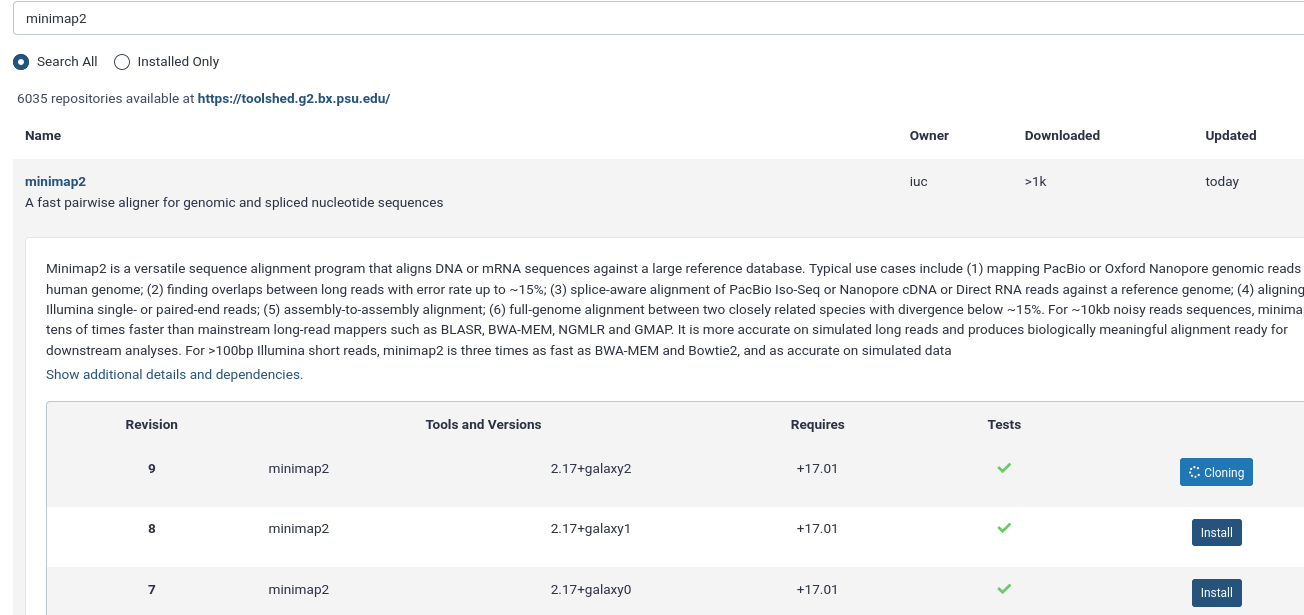
Input: Bashansible-playbook galaxy.ymlIn your Galaxy admin interface, install the minimap2 tool.
- Login to Galaxy as the admin user
- Click the “admin” menu at the top
- Under “Tool Management” on the left select “Install and Uninstall”
- search for
minimap2and install the latest version with the Target Section “Mapping”
Upload the following fasta file
>testing
GATTACAGATHISISJUSTATESTGATTACA
Map with minimap2 tool with the following parameters
- “Will you select a reference genome from your history or use a built-in index”:
Use a genome from history and build index- “Use the following dataset as the reference sequence”: The fasta file you uploaded
- “Single or Paired-end reads”:
Single
- param-file “Select fastq dataset”: The fasta file you uploaded
Your job should be executed using Singularity with a BioContainer! You can watch the logs of Galaxy to see this happening.
Input: Bashjournalctl -fOutputgunicorn[1190010]: galaxy.tool_util.deps.containers INFO 2021-01-08 13:37:30,342 [p:1190010,w:0,m:2] [LocalRunner.work_thread-1] Checking with container resolver [MulledSingularityContainerResolver[namespace=biocontainers]] found description [ContainerDescription[identifier=docker://quay.io/biocontainers/mulled-v2-66534bcbb7031a148b13e2ad42583020b9cd25c4:e1ea28074233d7265a5dc2111d6e55130dff5653-0,type=singularity]] gunicorn[1190010]: galaxy.jobs.command_factory INFO 2021-01-08 13:37:30,418 [p:1190010,w:0,m:2] [LocalRunner.work_thread-1] Built script [/srv/galaxy/jobs/000/23/tool_script.sh] for tool command [minimap2 --version > /srv/galaxy/jobs/000/23/outputs/COMMAND_VERSION 2>&1; ln -f -s '/data/000/dataset_22.dat' reference.fa && minimap2 -t ${GALAXY_SLOTS:-4} reference.fa '/data/000/dataset_22.dat' -a | samtools sort -@${GALAXY_SLOTS:-2} -T "${TMPDIR:-.}" -O BAM -o '/data/000/dataset_23.dat' > '/data/000/dataset_23.dat'] gunicorn[1190010]: galaxy.jobs.runners DEBUG 2021-01-08 13:37:30,441 [p:1190010,w:0,m:2] [LocalRunner.work_thread-1] (23) command is: mkdir -p working outputs configs gunicorn[1190010]: if [ -d _working ]; then gunicorn[1190010]: rm -rf working/ outputs/ configs/; cp -R _working working; cp -R _outputs outputs; cp -R _configs configs gunicorn[1190010]: else gunicorn[1190010]: cp -R working _working; cp -R outputs _outputs; cp -R configs _configs gunicorn[1190010]: fi gunicorn[1190010]: cd working; SINGULARITYENV_GALAXY_SLOTS=$GALAXY_SLOTS SINGULARITYENV_HOME=$HOME SINGULARITYENV__GALAXY_JOB_HOME_DIR=$_GALAXY_JOB_HOME_DIR SINGULARITYENV__GALAXY_JOB_TMP_DIR=$_GALAXY_JOB_TMP_DIR SINGULARITYENV_TMPDIR=$TMPDIR SINGULARITYENV_TMP=$TMP SINGULARITYENV_TEMP=$TEMP singularity -s exec -B /srv/galaxy/server:/srv/galaxy/server:ro -B /srv/galaxy/var/shed_tools/toolshed.g2.bx.psu.edu/repos/iuc/minimap2/8c6cd2650d1f/minimap2:/srv/galaxy/var/shed_tools/toolshed.g2.bx.psu.edu/repos/iuc/minimap2/8c6cd2650d1f/minimap2:ro -B /srv/galaxy/jobs/000/23:/srv/galaxy/jobs/000/23 -B /srv/galaxy/jobs/000/23/outputs:/srv/galaxy/jobs/000/23/outputs -B /srv/galaxy/jobs/000/23/configs:/srv/galaxy/jobs/000/23/configs -B /srv/galaxy/jobs/000/23/working:/srv/galaxy/jobs/000/23/working -B /data:/data -B /srv/galaxy/var/tool-data:/srv/galaxy/var/tool-data:ro -B /srv/galaxy/var/tool-data:/srv/galaxy/var/tool-data:ro --home $HOME:$HOME docker://quay.io/biocontainers/mulled-v2-66534bcbb7031a148b13e2ad42583020b9cd25c4:e1ea28074233d7265a5dc2111d6e55130dff5653-0 /bin/bash /srv/galaxy/jobs/000/23/tool_script.sh > ../outputs/tool_stdout 2> ../outputs/tool_stderr; return_code=$?; cd '/srv/galaxy/jobs/000/23';
1-run-minimap2.sh
You can manually pull one or many containers for tools in the admin menu. Go to the admin menu, click Manage Dependencies and select the Containers tab. This will list all tools, their dependencies and whether containers are already pulled or can be pulled on demand.
When a container has been resolved through Singularity, you’ll see something like this:

We often hear
What would be the best practice, use conda or Singularity?
Many of us are moving towards Singularity. Conda environments can resolve differently if they were installed at different times, which isn’t great for reproducibility. Singularity images are never updated after generation which makes them fantastic. Also the isolation that’s there by default is an incredible improvement for less-trustworthy binaries.
Yes and no. Singularity images are built from conda environments. Only now you are no longer responsible for solving the conda environment, or ensuring that all of the dependencies are installed. The Galaxy project uses a system called “mulling” to bring together multiple conda dependencies together in a single environment, and Singularity images are produced for these dependencies as well. That said, complex or unresolvable conda environments are not solved by Singularity, because Singularity is really just packaging conda’s environment into a single binary file.
When you open “Admin -> Tool Management -> Manage Dependencies -> Containers”, it sometimes shows “Gateway Time-out (504)”
Resolving all dependencies for all tools can take a bit, you can increase your timeout with the
uwsgi_read_timeoutsetting intemplates/nginx/galaxy.j2
In “Admin -> Tool Management -> Manage Dependencies -> Dependencies”, the Resolution for minimap2 @ 2.24 (as well as samtools @1.14) is “unresolved”. How can I resolve this issue?
Because our training uses containers for resolution it is expected that the non-container dependencies show as “unresolved”. There is not currently a view which indicates if the containers have been resolved.
Comment: Got lost along the way?If you missed any steps, you can compare against the reference files, or see what changed since the previous tutorial.
If you’re using
gitto track your progress, remember to add your changes and commit with a good commit message!
Frequently Asked Questions
Have questions about this tutorial? Check out the tutorial FAQ page or the FAQ page for the Galaxy Server administration topic to see if your question is listed there. If not, please ask your question on the GTN Gitter Channel or the Galaxy Help ForumFeedback
Did you use this material as an instructor? Feel free to give us feedback on how it went.
Did you use this material as a learner or student? Click the form below to leave feedback.

Citing this Tutorial
- Torfinn Nome, Marius van den Beek, Matthias Bernt, Helena Rasche, Use Singularity containers for running Galaxy jobs (Galaxy Training Materials). https://training.galaxyproject.org/training-material/topics/admin/tutorials/singularity/tutorial.html Online; accessed TODAY
- Batut et al., 2018 Community-Driven Data Analysis Training for Biology Cell Systems 10.1016/j.cels.2018.05.012
Congratulations on successfully completing this tutorial!@misc{admin-singularity, author = "Torfinn Nome and Marius van den Beek and Matthias Bernt and Helena Rasche", title = "Use Singularity containers for running Galaxy jobs (Galaxy Training Materials)", year = "", month = "", day = "" url = "\url{https://training.galaxyproject.org/training-material/topics/admin/tutorials/singularity/tutorial.html}", note = "[Online; accessed TODAY]" } @article{Batut_2018, doi = {10.1016/j.cels.2018.05.012}, url = {https://doi.org/10.1016%2Fj.cels.2018.05.012}, year = 2018, month = {jun}, publisher = {Elsevier {BV}}, volume = {6}, number = {6}, pages = {752--758.e1}, author = {B{\'{e}}r{\'{e}}nice Batut and Saskia Hiltemann and Andrea Bagnacani and Dannon Baker and Vivek Bhardwaj and Clemens Blank and Anthony Bretaudeau and Loraine Brillet-Gu{\'{e}}guen and Martin {\v{C}}ech and John Chilton and Dave Clements and Olivia Doppelt-Azeroual and Anika Erxleben and Mallory Ann Freeberg and Simon Gladman and Youri Hoogstrate and Hans-Rudolf Hotz and Torsten Houwaart and Pratik Jagtap and Delphine Larivi{\`{e}}re and Gildas Le Corguill{\'{e}} and Thomas Manke and Fabien Mareuil and Fidel Ram{\'{\i}}rez and Devon Ryan and Florian Christoph Sigloch and Nicola Soranzo and Joachim Wolff and Pavankumar Videm and Markus Wolfien and Aisanjiang Wubuli and Dilmurat Yusuf and James Taylor and Rolf Backofen and Anton Nekrutenko and Björn Grüning}, title = {Community-Driven Data Analysis Training for Biology}, journal = {Cell Systems} }